

Windows Cannot Be Installed To This Disk Fix: Everything seems to be going not the way you exactly want it to go. Even a simple right click on your PC seems to be taking years to bear results, at alone running a High Definition game. Giving up, you finally decide to do away with your present Operating System (OS) and either start fresh or simply booting to upgrade to the latest in the market.
But, it always doesn’t end the same way. More often than not we find some or the other errors while installing Windows and some of the most common ones are the ones relating to the Hard Disk Drive (HDD) storage issues. So, here we are trying to help you fix some of them.
Windows Cannot Be Installed To This Disk (Solutions)

• BIOS vs UEFI: Actually these two are the firmware, the later one being the more advanced one.
What is the firmware?
In simple terms, these are the most basic written sets of instructions which come engrained with your hardware and they tell the hardware “how to interact with the Operating System” installed or about to be put on.
Obviously, UEFI (United Extensible Firmware Interface) being the later product than BIOS (Basic Input Output System), have got more advanced features. But still, provided that it’s not from Mughal’s era, your Hardware mostly has support for both of these.
Related: This Copy Of Windows Is Not Genuine.

• MBR vs GPT:
These two the Partition tables. In layman’s language, these are the set of rules which tells the OS “how to go about when partitioning your HDD, where and how to make boundaries.”
The GPT (GUID Partition Table) have got advanced features like max limit of 128 partitions on a disk, while the same no. being a mere 4 for the older MBR (Master Boot Record).
The MBR is used by Legacy BIOS while UEFI goes for GPT. Remember:
Legacy BIOS – MBR
UEFI – GPT
I think that knowing this much is more than enough, so move on to know how to fix our 1st type of error.
Error 1: “Windows Cannot Be Installed to This Disk. The Selected Disk Is of the GPT Partition Style.”
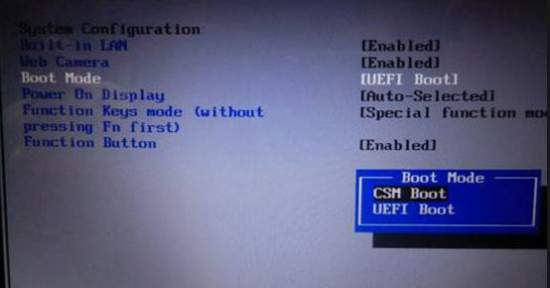
So it’s evident that your motherboard is going to the older BIOS mode which opts for MBR type partition and the partition was made using GPT algorithm. So the solution is either to change your boot mode or to change your partition style.
The simpler way is to change your boot mode to UEFI mode. First of all, you need to enter the BIOS. So, it’s better to know how to do it as different computers may have different keys for it. It will be helpful to search “how to enter BIOS plus computer trademark or motherboard name” on the internet for the same.
Afterward, this is how we will solve it.
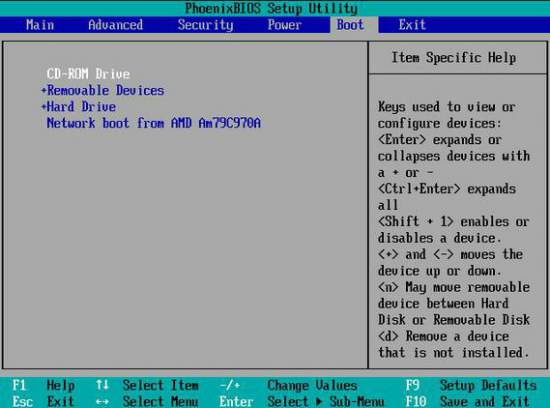
- Start/restart the computer and continuously press a key to enter BIOS before Windows logo appears.
- Once you see a screen with blues blacks and white something like this, look out for Legacy/ UEFI and set its value as BOTH and voila!
- Problem solved.
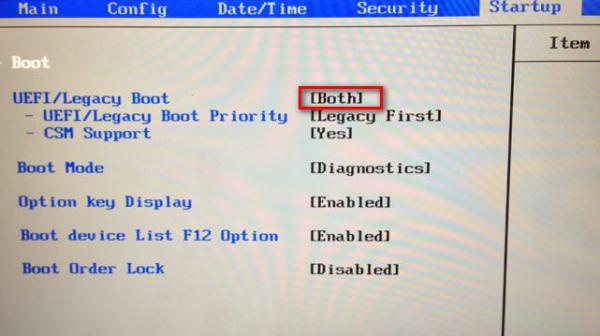


It may be possible that you may find this option under some other tab as different manufacturers enjoy the freedom of designing this menu as they like.
But what if you don’t find the option of UEFI at all among all the tabs? It means that you are using an old style motherboard which does not support UEFI mode. In such a case, the solution is to change the partition to GPT and we would be discussing three ways to do so.
How to Convert GPT Disk to MBR If the Motherboard Supports Legacy BIOS Only?
- Use Partition Wizard
MiniTool Partition Wizard Free Edition is a free partitioning tool for Windows. This idea works like charm if you are having a running OS. Just download, install and run it.
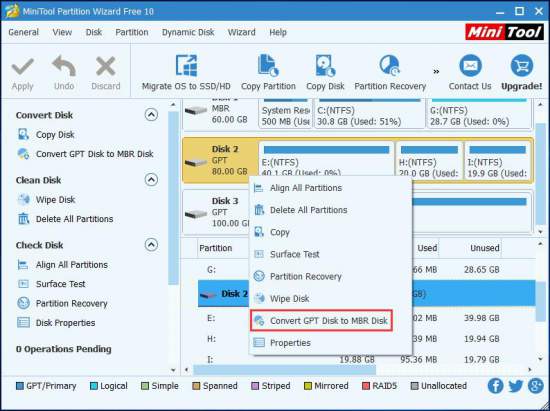
Step 1: Launch MiniTool Partition Wizard. Then right-click on the target disk to be converted and choose “Convert GPT Disk to MBR Disk”.

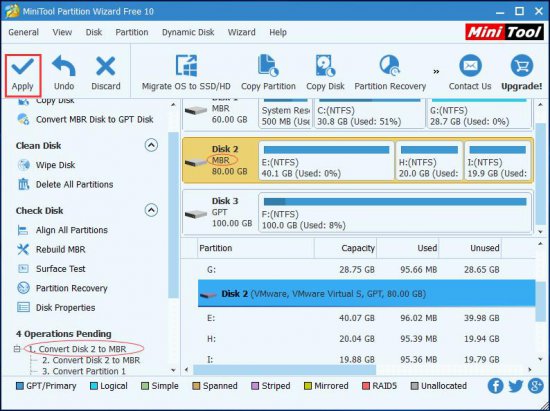
Step 2: You will see the GPT attribute is turned to MBR. Click “Apply” to confirm the change. And the good part is that after the conversion, you will find that all data as it was before, safe and sound.
- Use Disk Management Utility
This is the basic default version of the above tool which comes as a prepackaged system tool in windows.
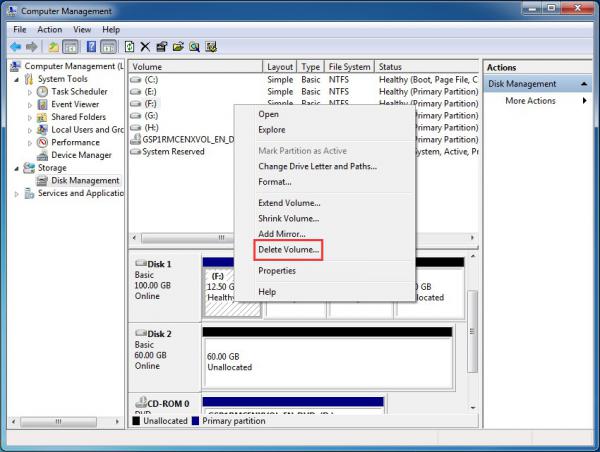
Step 1: Go to the desktop, right-click on ‘My Computer’ or ‘This PC’ icon, choose ‘Manage’ from the drop-down menu, and then select ‘Disk Management.’
Step 2: Delete all partitions or volumes on the GPT disk one by one via the right-click function “Delete Volume”. Out here do make sure that you have a data backup of all the contents on the disk.

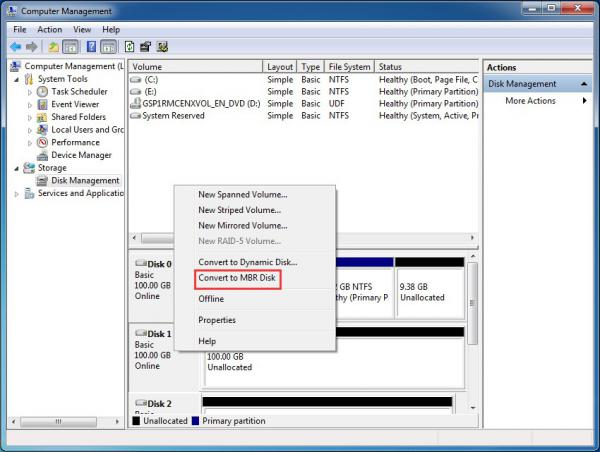
Step 3: After deleting, the entire disk will become an unallocated space. Then, right click the GPT disk and select ‘Convert to MBR Disk.’ It will convert GPT to MBR disk. Then, you can install Windows on this disk.
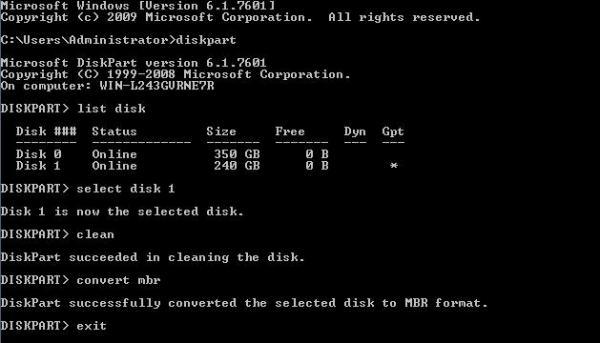
- Use Diskpart
This method works well if you don’t have access to your old OS. It can also help in conversion during the Microsoft Windows installation process.
Step 1: Go back to the install Windows interface where you started and press “Shift + F10” again to launch CMD. A black and white screen pops out. This is Command Prompt (CMD).

Step 2: Type in following commands:
-> diskpart
-> list disk
-> select disk 1 (1 signifies the number of GPT disk)
-> clean
-> convert MBR.

Now, done with that, we move on with the next one.
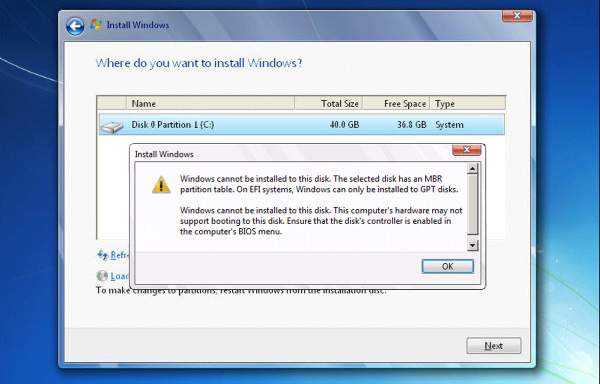
Error 2: “Windows Cannot Be Installed to This disk. The Selected Disk Has an MBR Partition Table. On EFI systems, Windows can only be installed on GPT disks”.
It comes while installing Windows 7, Windows 8, and Windows 10 OS. Again it’s self-explanatory, you are trying to boot your newer OS using UEFI mode into an older MBR style partition. A simple solution is to change your mode to both Legacy and UEFI following the method is shown in last error solution.
Or obviously the other way round! Convert MBR Disk to GPT Disk to Fix the Error.
Error 3: Windows Cannot Be Installed on Dynamic Disk.
There are basically two ways in which partitions are made on a physical HDD- Basic and Dynamic Disks being their nomenclatures.
Microsoft says.
“You can perform a fresh Windows installation on a dynamic volume only if that volume was converted from a basic volume and retained an entry in the partition table. Simple volumes converted from basic disks do not have an entry in the partition table unless they were a system or boot volumes prior to conversion.”
–from Microsoft Resource
To put it layman’s language, you cannot install windows to a dynamic disk until and unless it was made a dynamic disk purposefully while last OS installation.
So the solution is to convert the dynamic disk to a basic one. And we have got two ways to do so.
- Use MiniTool Partition Wizard
Step 1: Launch MiniTool Partition Wizard. Right Click on the dynamic disk you want to convert and choose “Convert Dynamic Disk to Basic Disk”.
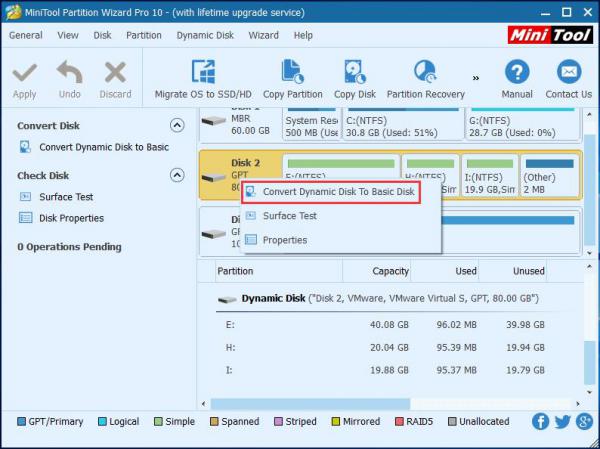

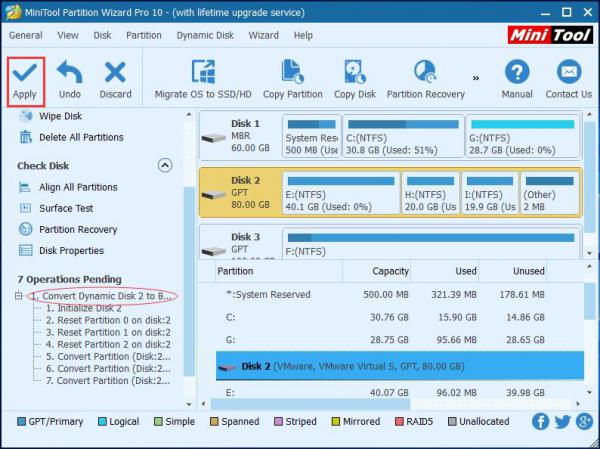
Step 2: In the preview, you can see that the dynamic disk has been converted into the basic disk without any data loss. Click on ‘Apply’ to finish the conversion.
- Using Diskpart
The above method is employable only if you have bought the premium copy of the MiniPartition Tool. So, the next solution is using CMD in starting itself.
Step 1: Boot computer via the installation disc and open CMD by pressing on “Shift + F10”.
Step 2: Type corresponding commands to delete all dynamic volumes one by one:
->diskpart
-> list disk
-> select disk N (N is the number of the dynamic disk)
-> detail disk
-> select volume=0
-> delete volume
-> select volume=1
-> delete volume

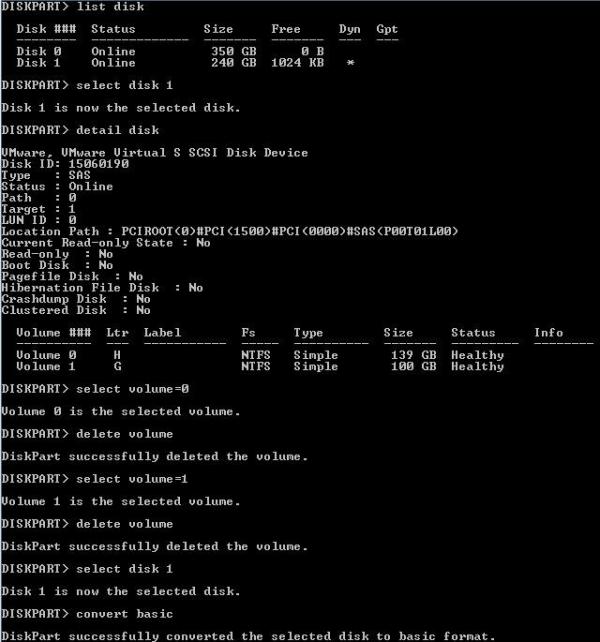
Step 3: The dynamic disks will get deleted. Now, type “convert basic”. Once Diskpart shows it has successfully converted the selected dynamic disk to basic, you can type “exit” to quit from Diskpart.
Error 4: Windows Cannot Be Installed to This Disk. This Computer’s Hardware May Not Support Booting to This Disk.
The error may also be followed by something like this in some of the systems:
“Ensure the disk’s controller is enabled in the computer’s BIOS menu.”
The basic reason for this can be any of the following:
- SATA controller mode was set incorrectly
- Or your HDD has got security Protections
Try out the following solutions:
For the later anomaly, please read the specification or contact sales person to confirm whether there is hard disk protection if you yourselves haven’t configured the system. If there is, remove the protection by following instructions.
Now coming to the next possibility.
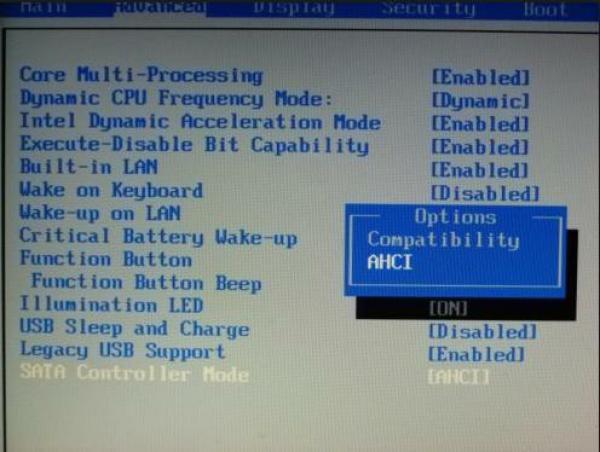
Basically, SATA stands for Serial Advanced Technology Attachment is the more of a connecting wire (called bus in the arena of computers) between the hard drive and the motherboard. Its mode decides which set of rules and regulations it is going to follow while the communication of these two take place. The two available modes are AHCI (Advanced Host Controller Interface) and IDE mode, later being the older and more basic product. So, as the error indicates that whichever mode your PC was using is not supported by the new OS. So, it ought to be the other one for sure!
The best solution is to set the BIOS to its default factory settings and most if the time it works out well. Different BIOS have different options for setting itself to factory settings, like Restore Defaults, Load BIOS Defaults, and Load Optimal Defaults, so choose the correct one according to practical situations.
Another way is to manually change the mode. Go to Advanced tab and change the SATA controller mode. If the current state is IDE, change it to AHCI or the other way round.
Error 5: Windows Cannot Be Installed to This Hard Disk Space, Windows Must Be Installed to a Partition Formatted in NTFS.
If you are going to deal with this, you ought to have a little info on File Systems.
File Systems are basically the set of codes which manage the whole system of creating, storing, retrieving, deleting of for that matter any task relating a file. Two of them are FAT (File Allocation System) and NTFS (New Technology File System). exFAT and 32FAT both are the variations of the FAT system which is used mostly for small storage devices like Pen Drives.
For installing the Windows, the HDD needs to be formatted in the NTFS system, as follows:
Remember, you can’t format the current boot partition even if you use Disk Management or CMD. It’s because Windows doesn’t allow the primary partition easily. And, without any operating system to work around, it becomes even more difficult. So, we recommend using MiniTool Partition Wizard Bootable CD to make formatting easier.
Use MiniTool Partition Wizard
Step 1: On the toolbar of each Partition Wizard paid editions, launch Bootable Media Builder to create a bootable CD/DVD disc or USB flash drive. Then, set the computer to boot from the bootable media and finally enter MiniTool Partition Wizard Bootable.
Step 2: Click on a partition to format and select “Format Partition” from the menu.

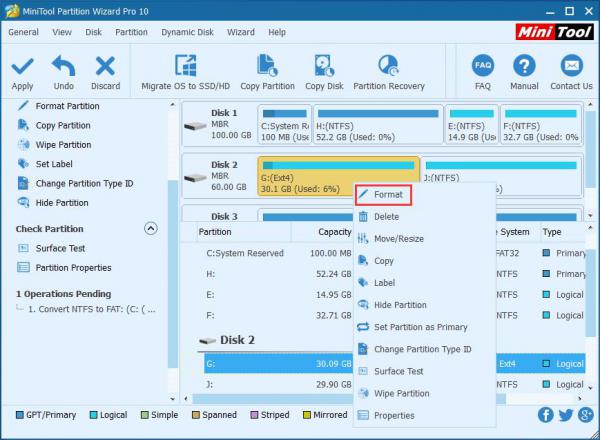
Step 3: In the pop-up window, choose NTFS at the file system and then click “OK” to continue.

Step 4: On the main interface, click “Apply” to apply this change.
Use Windows Installation Disk
You can format the partition to the required format during the installation process. At the “where do you want to install Windows” screen, choose the right partition/volume, and then click on ‘Drive Options (Advanced). Format it.
Error 6: Windows Cannot Be Installed to This Disk. The Disk May Fail Soon.
The following error message may also come when installing Windows:
“Windows cannot be installed to this disk. The disk may fail soon. If other hard disks are available, install Windows to another location.”
Now, this is the case of real physical damage to the HDD. The first thing you need to do is to back up your data as soon as possible. And contact the respective service center.
Error 7: Windows is unable to install to the selected location. Error: 0x80300001
In the process of installing Windows 7, some users face error which states “Windows is unable to install to the selected location. Error: 0x80300001”. It is a typical error and asks you to exchange hard drives to install the required drivers on the system and the system disk hasn’t been put back. There could be other reasons too. So, you need to go through other solutions as well.
Solution 1: Reconnect Windows installation disk
- Reboot the system using Windows installation CD or USB disk. On the step which asks selecting a partition, you need to click on Load Driver. The error message may pop up, but ignore it for a while.
- Disconnect and insert the install disk again and click on Refresh link. Then, click on Advanced Drive Options to create a new partition with any size. If Windows prompts to carry out operations, click OK. Then, a new system partition and a new primary partition will appear.
- Select the new primary partition and click Next button to let the setup continue without any more hassle.
Solution 2: Change boot order
Another cause why the error occurs is that the disk is not as boot disk provided that you are not using RAID. In such a case, you will need to change the boot order in BIOS and get rid of this problem.
- Open BIOS utility while rebooting the PC.
- Go to the Boot tab. You need to figure out where the Boot option is in your system. It’s because all BIOS utilities may look different.
- Locate it and select it.
- Set the hard drive where you want to install system as the boot disk. You can change the order of attached storage devices like USB, HDD, etc. from here.
- Save Changes and Exit.
Error 8: Windows cannot be installed to Disk 0 Partition 1
Users trying to install Windows via internal SAS controller for hard drive may get to face the error message “Windows cannot be installed to disk # partition #”. The usual reason behind this issue is the SAS driver or corrupted MFT. The Microsoft Windows partition manager is out of touch with driver after changes were made on the partition.
Here’s how you can fix this problem.
- On the step where Windows installation process asks the location to install Windows OS, load the SAS driver from USB key. If the file is over 2TB and needs to be converted to GPT, follow the mentioned steps in the previous solutions.
- Check all possible partitions for system installing. If the required disk doesn’t load, check whether the driver is correctly installed or not.
- Delete partitions until only Unallocated Space is left. Click New and recommended partition size will appear. Continue OK and you will see 3 partitions: system partition, MSR partition, and the large partition. To complete the step, you can take help of the PartitionGuru to repartition the disk and choose GUID partition table. It’s easier and intuitive.
- Choose the big partition and click Refresh. Then, you need to click Next so that the installation process can begin.
Hope that the Windows Cannot Be Installed To This Disk error gets fixed. Stay tuned to TheReporterTimes for more Windows errors and fixes.